Your services list is the price list ArborDash fills estimates and invoices from. Pick a service on an estimate and its name, description and price come with it. The list lives under Settings, on the Services & Items tab.

Price a service that is already there
A new company arrives with 15 categories (Trim & Prune, Stumps, Fees and so on) and 30 generic tree care starter services inside them, each with a description written. None has a price, because nobody wants software inventing a number for a removal. So the first job here is pricing the ones you sell and deleting the ones you do not.
- Open Settings and click the Services & Items tab.
- Click a category name to expand it. On your first visit the first two are already open and the rest are collapsed.
- Find the service and click Edit on its row.
- Type your figure into Default Price.
- Click Save.
In a hurry, type into Search services... at the top. It matches names and descriptions and opens every category as you type, so nothing hides in a collapsed one.
A service with no price puts $0.00 on the estimate. Nothing warns you and nothing stops you saving or sending it. The line stays at zero until you type a price over it, so price them here first.
You do not need Save Changes. That button at the top of Settings saves the Company tab. Services save themselves the moment you click Save or Add Service inside their own window.
Add a service
- Add Service, top right, starts in your first category.
- + Add Service to Category name, at the foot of an expanded category, starts in that one.
Either opens a window with six tabs. Everything that matters for pricing is on General; the rest hold upsell suggestions, hazards, chemical logging and kit lists.
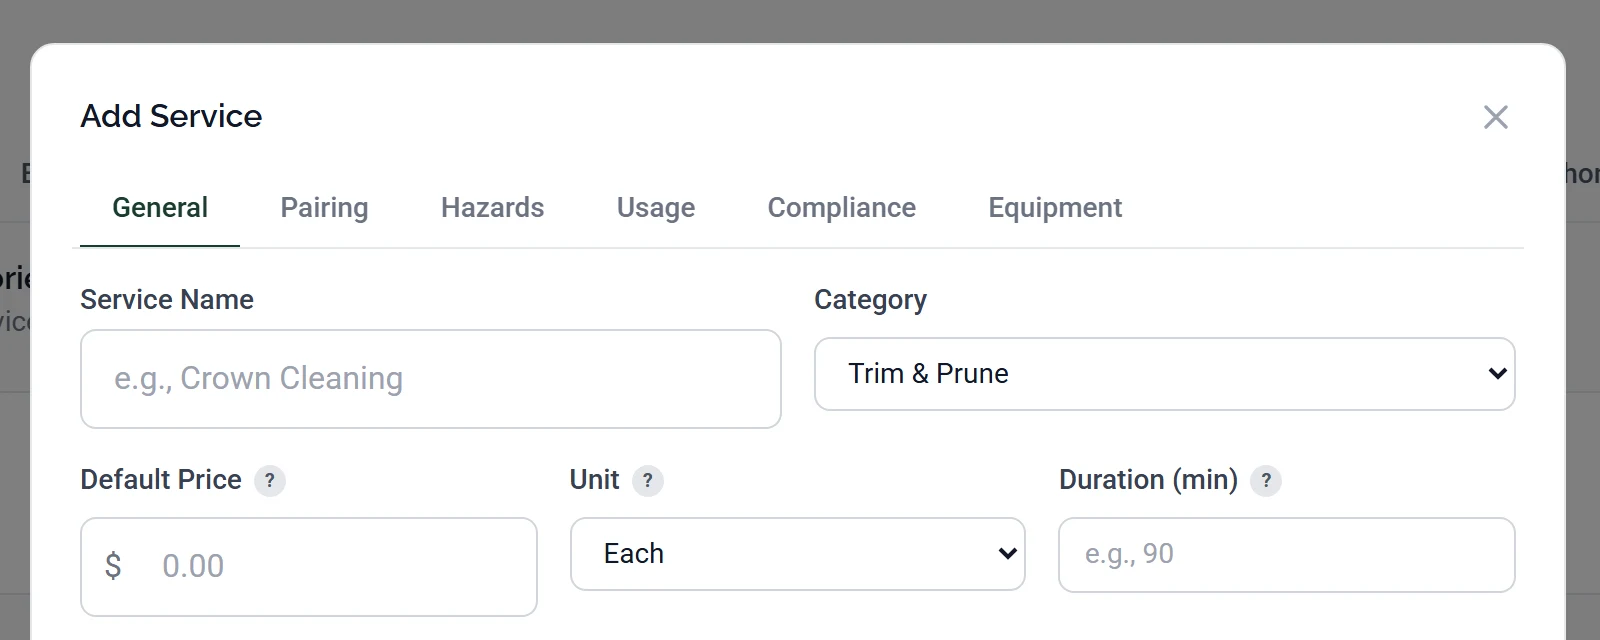
| Field | What to put in it |
|---|---|
| Service Name | What the customer sees on the estimate. “Crown Cleaning”, not “CC-lg”. |
| Category | Where it sits in the list. Uncategorized is allowed but harder to find later. |
| Default Price | Your standard price. It fills the line on every estimate and you can still change it there. |
| Unit | A label only, outside Use Measurement Unit. Read the warning below first. |
| Duration (min) | How long the work takes, for scheduling and routing. Never shown to the customer. Type a number and a switch appears beside it. Per job (flat) holds the duration whatever the quantity, and Per quantity multiplies it, so 90 minutes on a quantity of five comes to seven and a half hours. |
| Description | The wording that drops onto the estimate line, and what the customer reads. Write it properly once. |
Fill those in and click Add Service.
Unit is a label, not a calculation. Setting Per Hour does not make ArborDash multiply by hours, and the unit never appears on the estimate or the invoice. A line total is always quantity times price, so for hourly work put your hourly rate in Default Price and type the hours as the quantity. The one exception is Use Measurement Unit, which makes the line total your price times the measurement you type on the estimate. See Measurement and volume pricing at the end.
Neither Add button clears every field. Duration, the sales tax tickbox, any pricing tiers and the picks on the other tabs can carry over from the last service you had open. Name, category, price and description are always blank. Glance over the window before you save.
Categories
Categories are the headings your services group under, here and in the picker on the estimate form. Click Add Category, give it a name, pick a colour, and save. Edit and Delete sit on each category's header row.
Names have to be unique, ignoring capitals. Reuse one and the window stays open with no message. That looks like a hang but it is a refusal, so change the name or cancel. There is no way to reorder categories or services either, so the sequence you create them in is roughly the sequence you get.
Deleting a category does not delete its services. They move to an Uncategorized group at the bottom of the list: “Services in this category will become uncategorized.” That group is hidden while empty, which is why you may never have seen it.
Moving a lot of services at once

Every row has a tickbox, and the one in the table header ticks the whole category. Tick some and a blue bar appears reading “N services selected”. Choose a category in Move to category..., or Remove from category, then click Move. Clear unticks everything.
Move stays greyed out until you have picked a destination, which is the usual reason it seems not to work.
Deleting and renaming
Click Delete on the row and confirm. The confirmation says what happens: “It will no longer appear in new estimates or invoices.” Existing estimates, invoices and jobs are untouched, so prune the starter list freely.
Renaming is the one that reaches backwards. Rename a service and every job already using it starts showing the new name, on the schedule, in the crew's app and on the route, because jobs read the name from this list every time they load. Estimates do not: they keep the name as it was the day you saved them. If a new name would confuse a crew mid-season, add a new service and delete the old one instead of renaming.
QuickBooks, both directions
If QuickBooks is connected, this page works both ways. Nothing in this section is on screen otherwise, so skip it if you have not connected. A green QB badge next to a service means it is linked to a QuickBooks item. Add a service while QuickBooks is connected and a matching item is created as part of saving. For services that pre-date the connection, tick them and click Push N to QB in the blue bar.
Coming the other way, the card headed QuickBooks Services, Products & Fees below your own categories lists what QuickBooks already has. Tick the items you want, pick a destination in Move to category..., and click Assign. Each becomes a linked service with its QuickBooks name, description and price.
A failed push says nothing. The bar sits there unchanged, no badges appear, and there is no error message. Usually QuickBooks has no service item for ArborDash to copy an income account from, so if nothing changes after a few seconds, create one service item by hand in QuickBooks and try again.
Changes to a linked service's name, description or taxability here are sent to QuickBooks too. Its price is not, so change a price in both places if it matters to your books. If the QuickBooks half of a save fails, the service still saves here and you are not told.
What this looks like on an estimate
Click Select service... in the Service Type box and your list opens as a picker, with the same categories and colours. Three differences from this page:
- Empty categories are hidden, so a short picker can sit on top of a long list here.
- Uncategorized services appear under a heading called Other Services.
- A service with no Default Price shows the word Quote instead of a figure.
If the picker says “No services configured yet”, the company's list is empty.
Measurement and volume pricing
Measurement Unit (optional) sits further down the General tab. Switching Unit to Use Measurement Unit before you have set one is refused with “Set a Measurement Unit to use measurement-based pricing.”
Volume Pricing, lower down the same tab, sets a different per-unit price once the quantity reaches a number you choose. Its two hints contradict each other. The tooltip says the lowest matching tier is applied; the grey line under the tier rows says “Highest matching tier wins.” The grey line is the one that matches what the software does, so a quantity of 12 against tiers at 5 and 10 gets the price you set at 10.
Auto-pricing from the property map is hidden most of the time. Enable auto-pricing from property map and its price-per-unit field only appear once Measurement Unit is Square Feet, Linear Feet or Acres and Unit is something other than Use Measurement Unit. The two are mutually exclusive, so if the tickbox is not there, one of those two fields is the reason.
Common questions
Can my crew see my prices?
No. Settings is an owner and admin page, and an employee does not see it unless an owner switches the Settings page on in that person's permissions. On a job, an employee sees the service, its description and the quantity, with the Price and Total columns hidden.
Can I change a price on one estimate without changing my list?
Yes, and that is the normal way to work. The price on an estimate line is editable. Default Price is a starting point.
Where do I set sales tax?
Not here. The Billing tab of Settings holds a Sales Tax card, which only exists once QuickBooks is connected, with a Default tax code dropdown and a New services are taxable by default tickbox. Those, and the Charge sales tax on this service tickbox on a service, only control what reaches QuickBooks. ArborDash totals add no tax either way.
Can two services have the same name?
Yes. Nothing stops you and nothing warns you, and two identical names in the picker is a real trap, so search this page before adding one you think you may already have.