A finished job becomes an invoice with one control: Convert To Invoice, on the job's own page. Every service, quantity and price comes across, your saved terms and footer are applied, and the window that sends it to the customer opens straight afterwards.
You cannot start this from the Invoices page. New Invoice builds one from scratch, from an estimate, or as a copy of another invoice, never from a job. To bill a job, go to the job.
Before the button appears
Convert To Invoice shows only on a job that is completed, is not a free quote, and is not already prepaid. A free-quote job shows Create Estimate instead. A prepaid job carries a green Prepaid badge that opens the invoice it was paid on.
To reach Completed, click Start Work on the job, then Mark Complete and confirm with Complete Now. Three things get in the way: a job with no scheduled date refuses, with the message “Cannot mark complete without a scheduled date. Please set a scheduled date first.”; a job set to need customer confirmation shows Confirm where Start Work would be; and a service needing a chemical application log stops with Chemical Application Log Required, offering Log Application Now or Complete Anyway.
Convert the job
- Open the finished job and click Convert To Invoice, at the top of the page beside Edit Job.
- Check the services. The window lists every service with its Qty, Price and Total, and you cannot edit that list here. If something is wrong, fix it with Edit Job and come back.
- Check Payment Terms. The dropdown opens on your Default Payment Terms from Invoices → Settings. The choices are Due on Receipt, Net 15, Net 30 and Net 60, and you can change it for this invoice.
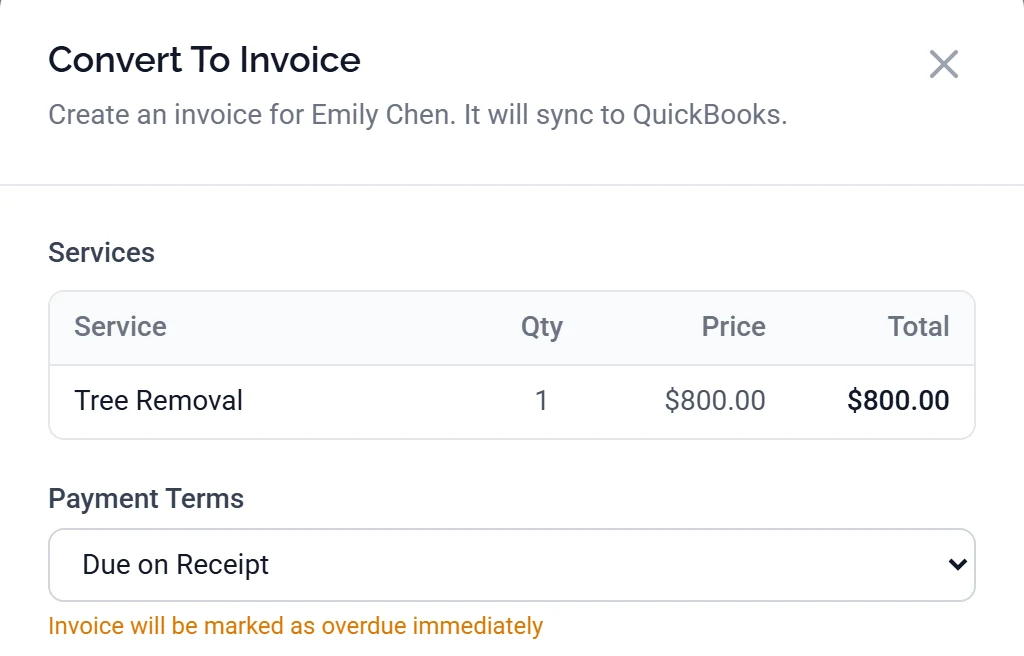
Payment Terms opens on your default. On a company that has never changed it, that default is Due on Receipt, and the amber line underneath says the invoice will be marked as overdue immediately. - Add a Discount if you are giving one. Flip the switch, name it in the Discount name box, pick % or $, and type the amount. A whole-job discount on the job is filled in for you; a per-line one is not.
- Type anything the customer should read into Invoice Notes, or leave it empty.
- Check the summary: Subtotal, the discount, Total, and the Due Date your terms produce.
- Click Convert To Invoice at the foot of the window. The button shows a spinner while it works, and Cancel is disabled until it finishes.
The job's badge changes to Invoiced and the Send Invoice to Customer window opens on its own.
Due on Receipt marks the invoice overdue at once
Picking Due on Receipt prints an amber line under the dropdown, “Invoice will be marked as overdue immediately”, and the Due Date in the summary reads Immediately. The invoice is created with the status Overdue and a due date of today.
Without QuickBooks connected, the Invoices page then badges it Overdue, its balance in the red Overdue figure, before you have sent anything. With QuickBooks connected the list shows what QuickBooks reports instead, so it reads Not Sent until it goes out, then Overdue · Sent.
Every company starts with Due on Receipt as its default, so unless you have changed it, every invoice you create is late on the day you write it. Set Default Payment Terms to Net 15 or later on Invoices → Settings. The dropdown fixes one invoice; the setting fixes all of them.
What carries across from the job
The customer comes across, with one invoice line per service line at the same quantity and price. Each line is described with the service name, its catalogue description and your line details. Tree and property markers come across with their lines. Your Internal Notes stay on the job, and a whole-job discount is filled into Discount while a per-line one is not.
Your terms and footer are applied without asking
The window has no fields for your Default Terms & Conditions and Invoice Footer, so both are copied from Invoices → Settings as the invoice is created, as a snapshot: changing the defaults later does not touch invoices that already exist. To change them on one invoice, open it and click Edit, which is hidden on an invoice QuickBooks does not hold.
The footer shows on the customer's portal page and at the bottom of the invoice email. The terms show on that portal page and on the invoice page here, but not in the email body, whatever the send window's What's included in the email list says, and not on the PDF or printed copy unless you switch on Include Terms & Conditions on PDF/print output, which starts off.
Sending it
In the Send Invoice to Customer window, check the Email address it shows, with its Change link. Leave Customer Can Remove off on work you have already done: turning it on lets the customer take that line off the bill. Then Preview and Send Invoice.
Opened from the job, this window does not offer the Include Photos or Attach PDF copy switches, or the Invoice Notes you typed, though the notes stay saved on the invoice. Send from the invoice's own page instead and you get all three, with Include Photos there only when the job has photos.
Closing the window does not undo anything. The invoice was created before the window opened. Click Cancel and it is on your Invoices page unsent, ready to send from there.
Finding the invoice from the job
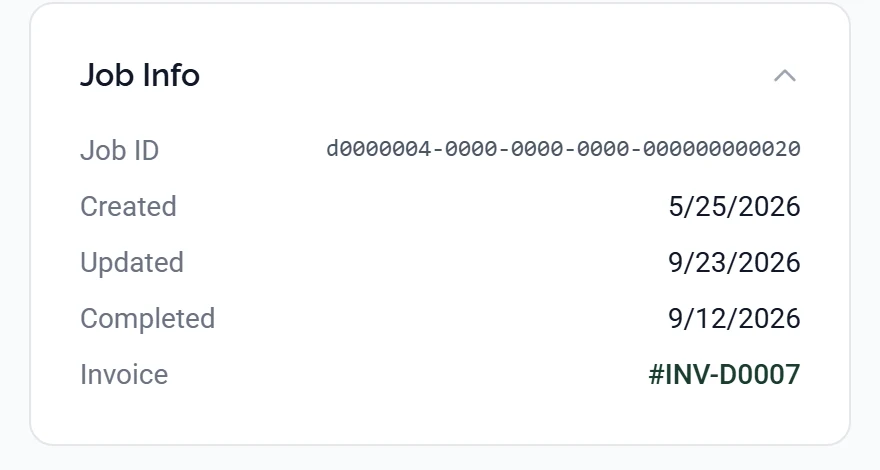
Open the Job Info card in the right-hand column of the job's Overview tab. It starts closed, so the link is not visible until you do. Its last row, Invoice, links to the invoice by number: the QuickBooks number when QuickBooks is connected, an ArborDash one like INV-2026-A4C2 when it is not.
On the invoice, the Details tab has a Linked Job card in its right-hand column. It appears on an invoice that bills a single job, not on a rollup covering several.
If the Invoice row is missing from an invoiced job, check the Invoices page. An invoice created while QuickBooks was disconnected can leave the job unable to find it, and the row is then hidden with no message rather than showing a broken link.
How this works with QuickBooks
With QuickBooks connected, the invoice is created in QuickBooks first, and the copy saved here uses the number QuickBooks assigned. If that step fails, nothing is created anywhere: the job stays Completed and no half-invoice is left behind, so fix what the red message names and convert again.
Without QuickBooks connected, the window says so, in an amber line reading “QuickBooks is not connected, so this invoice will be saved here only.” The invoice still sends and still takes payment through the portal, but Edit, Duplicate Invoice, Void Invoice, Delete Invoice and Record Payment are hidden, because those are ledger operations.
A discount reaches QuickBooks as its own discount line only if your chart of accounts holds an income account with Discount in its name. Without one, the discount is spread across the line prices instead, so your books show cut prices rather than a discount.
Several jobs at once
Batch Invoice and Rollup Invoice, in the Invoices page header, bill several completed jobs at once: one invoice per job, or several of one customer's jobs on a single invoice. Both pick up your default terms and footer, and neither sends anything.

With QuickBooks connected, Batch Invoice badges a customer who is not synced to it Not in QuickBooks and skips that job. The Batch Complete summary names everyone who was skipped, so read it before you treat every completed job as billed.
When it goes wrong
| What you see | What it means |
|---|---|
| A red message beginning Cannot create invoice: | Nothing was created, here or in QuickBooks, whatever the rest of it says. Customer is not synced to QuickBooks ends by claiming the invoice was saved locally, and it was not. The job is untouched, so fix what it names and convert again. |
| A red banner reading The invoice was created, but this job could not be marked invoiced | The invoice exists. Only the job's status did not move, leaving it billable twice. Do not convert again. Use Open the invoice in the banner to check or send it, then set the job to Invoiced with the Status dropdown on its row in the Jobs list, because the job page has no Invoiced button. |
| An amber banner saying the invoice was saved without its line items | The invoice exists, in QuickBooks and here, but its lines did not save. Do not convert again, because that would bill the customer twice. Open the invoice and add the lines. |
| An amber banner reading Your invoice defaults could not be read | The invoice was created without your terms and footer, on the payment terms you picked. Open it, click Edit, and use Apply Default on both. Without QuickBooks there is no Edit button, so that invoice keeps no terms and no footer. |
| A red message reading Could not determine your organization, so the invoice was not saved | Nothing was created. Reload the page and convert again. |
Common questions
Can I change the invoice after converting?
Yes, if QuickBooks holds it. Open it and click Edit, and changes save to both QuickBooks and here. Once a payment has been applied QuickBooks refuses line and amount changes, and the form warns you at the top.
The customer paid before the job. What then?
Do not convert. On the scheduled job, use Mark Prepaid and match it to the invoice they paid, so you do not bill them twice.